
Preventing Blotchy Wood Stain- Tips & Advice
When it comes to achieving a flawless wood stain finish, preventing blotchiness is crucial. Blotchy stain can ruin the appearance of your woodwork, leaving uneven patches and streaks. At Sherwin-Williams, we understand the importance of a consistent and professional finish. Below is our offering of tips and advice to help prevent blotching for your next wood staining project.
How to Prevent Blotchy Wood Stain
Blotchy wood stain can be a frustrating issue to deal with, especially when you're looking to achieve a smooth and even finish. Understanding the causes of blotchy stain, the types of wood prone to blotching, and the effects it has on wood appearance can help you prevent this problem and achieve professional-looking results. Our below video and article can help you achieve ideal results when it comes to preventing blotching, or when dealing with wood prone to blotching.
Causes of Blotchy Wood Stain:
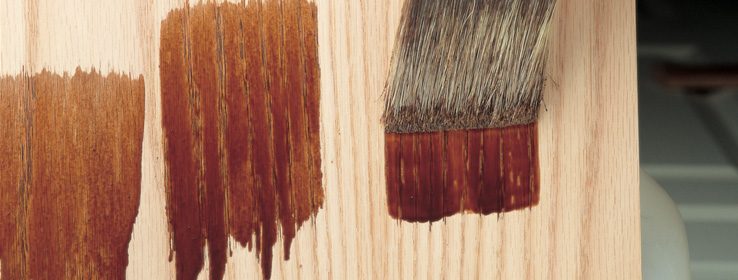
Blotchy stain occurs when the wood absorbs the stain unevenly, resulting in dark and light patches. There are a few common causes of blotchy stain:
- Wood Grain: Woods with open or porous grain, such as pine, cherry, or birch, are more likely to absorb stain unevenly. The stain may penetrate deeper into the porous areas, leading to darker patches.
- Uneven Sanding: If the wood surface is not sanded properly or if there are rough spots, the stain may be absorbed differently, resulting in blotches.
- Wood Condition: Moisture content and the condition of the wood can also affect how it absorbs stain. Wet or damaged wood may lead to uneven stain absorption.
Effects of Blotchy Stain on Wood Appearance:
Blotchy stain can significantly impact the appearance of your wood project. Instead of a consistent and even color, you may end up with splotches and streaks that detract from the overall beauty of the wood. This can be particularly noticeable on large surfaces or when using lighter stain colors.
At Sherwin-Williams, we understand the importance of achieving a flawless finish. Our range of wood stain products is specifically designed to help prevent blotchy stain and ensure even, consistent results. With our high-quality stains and expert advice, you can achieve professional-grade finishes that enhance the natural beauty of your wood projects.
Pre-Stain Preparation Techniques
- Proper sanding techniques before staining:
- Before applying wood stain, it is crucial to properly prepare the wood surface through sanding. Start by using a medium-grit sandpaper to remove any rough spots, imperfections, or old finishes. Sand with the grain of the wood to achieve a smooth and even surface. Gradually move to a finer grit sandpaper, such as 220-grit, for a polished finish. Ensure that all dust and debris are removed from the surface before proceeding to the next step.
- Applying wood conditioner for even stain absorption:
- To prevent blotchy wood stain, it is recommended to use a wood conditioner before applying the stain. Wood conditioners help to seal the wood and promote more even absorption of the stain. Apply the wood conditioner according to the manufacturer's instructions, ensuring complete coverage. Allow sufficient drying time before proceeding to the staining process.
- Choosing the right type of wood for a more uniform stain:
- The type of wood you choose can greatly impact the uniformity of the stain. Some woods, such as pine or birch, tend to absorb stain unevenly, resulting in blotchy finishes. Opt for woods with a tighter grain, such as oak or maple, for a more consistent and uniform stain. It is also advisable to test the stain on a small, inconspicuous area of the wood before applying it to the entire surface to ensure the desired results.
Application Tips for Blotch Prevention
When it comes to achieving a flawless wood stain finish, preventing blotchy results is crucial. Here are some application tips to help you achieve a consistent and smooth finish:
1. Use long, consistent strokes when applying the stain. This technique helps to distribute the stain evenly and minimizes the chances of blotchiness. By avoiding short, overlapping strokes, you can maintain a more uniform appearance.
2. Remove excess stain before it dries. After applying the stain, use a clean cloth or rag to gently wipe away any excess product. This step helps to prevent the accumulation of stain in certain areas, reducing the risk of blotches.
3. Consider alternative methods to prevent blotchy stain, such as using gel stains or washcoats. Gel stains are thicker than traditional liquid stains and can help limit the penetration of the stain into the wood, resulting in a more even color. Washcoats, on the other hand, are thin layers of finish applied before staining to seal the wood and create a barrier, preventing the stain from penetrating unevenly.
By following these application tips, you can enhance your wood staining process and achieve a professional-looking finish. For a wide range of high-quality wood stains and finishes, explore the products available on the Sherwin-Williams Industrial website.
Wood Finishing Academy
More from the Wood Finishing Academy
Scroll to view more of the great finishing tips from the Wood Finishing Academy.
Academy Home Page


Need Additional Support?
Get in touch with your Sherwin-Williams Industrial Wood representative to learn more about how we can support you and your coating projects.