SW-Aerospace-Smart-Repair-Video-Series-SKYscapes-Clear-Coat-CM0850180-Fully-Cured-English-video-en_US.mp4
GFX: Sherwin-Williams Aerospace Coatings
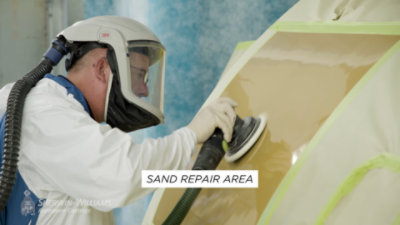
[00:00:12] Hi, guys. My name is Richard Giles, Sherwin-Williams Aerospace Technical Service and training manager. I'm here at our training facility in Andover, Kansas. We're going to be talking about the aged 180. We assume that this aircraft has been flying to the paint finish is mature. It's an MRO. It could have a scratch. It could have some type of damage. A fastener, for example, off a body faring. The problem and the challenge for us as the refinisher it is to polish an aged 850180. So it's a real puzzle. The technique where we're gonna be using today alleviates a lot of that with a masking technique which uses soft face. And in this case, we're using a J tape. You need a soft face roll to actually limit the amount of ingress into the nonstandard area. So with this technique and again, it's very important on the masking side that we offer a step system where we're minimizing the repair real estate and also the buffability. For this particular instance, we're going to be cleaning with the CMO 110158, preparing the area for painting and getting it all nice and clean. Any repair you do is reflective of the preparation itself. In this instance, it's P320. You can use red scotch bright, which is around the same tooth height. This is to deglaze the clear completely. Following up, of course, we're now going to clean the area and then we're going to start masking. This is a soft face process. And again, just to limit the amount of ingress to the nonsanded clear. So let's let's clean first of all.
GFX: Wipe the area with CM0110158 basecoat surface cleaner
So we'll let this evaporate for a few seconds. Make sure the area is dry and then we're going to start our masking sequence.
[00:02:18] So, again, what you need is a soft face material today. And the idea is certainly on GAs. There may not be a scene that may not be some localized area that you can break line. In many cases, it's easier to actually sand to a seam and reclear. But where there's no area, possibly the environment isn't paint friendly. It could be an MRO shop where you're doing a very small area. This can be to scale any scale. But the principle is to repair an aged clear with a very acceptable finish and result around the edge of the of the area. So this is again, it's called J tape. It's a soft face material. And I take my gloves off here. You actually need two layers of this plus masking tape. So although it's it seems a little bit time consuming. It's actually very fast. The results are very good. It prevents a larger area being painted a lot of the time, which again can create its own issues and concerns. So we've got we very much going to cut this to the size, approximate size of the repair. It's an adhesive backing. Now, this is the, I guess, the secret to this. You can see that there is a sticky tape within two shoulders, which are nonadhesive. The nonahdesive shoulder has to fit within the space of the abraided area. So if we look at where we are here, the slots over the abraided area. So if you look at this, you can see that where the soft face is actually on the abraided area.
GFX: Use back to back layers of Jtape
[00:04:23] So this goes flush one against the other. This would be, for example, a body firing a section of body firing. Could be an engine. So a fuselage section, we'll just mask around it and then use a paper mask exposing this sort of framework. Okay. And finally, on this soft face, the actual nonadhesive color here is quite wide enough. It needs to be extended. This is used for sweet lines, shields, etc. and automotive. But we found a good use for this.
[00:05:20] What we need to do is actually very softly put this over the soft face where the clear coat is going to flutter into this without actually touching the soft base.
[00:05:38] What we're going to do now using the full strength clear is to actually paint the exposed area. Then we're gonna demask exposing the raw edge from the soft face and we're gonna use a detailed gun almost an airbrush. And we're gonna just find pencil line where the abraided area is and not minimize us touching the non abraided clear.
[00:06:05] So we can say we've finished up the masking, we've exposed the envelope here with the soft face actually two soft face materials and we'll just finish wrapping this, the secondary masking paper just purely to stop it, any oversight, any ingress, could be a window like for example.
GFX: Wrap surrounding area with masking paper
So prevention is far better than cure. So there we are ready to attack our repair. I'm gonna be using this a small repair gun because of the scale. And very often on aerospace, repairs are delicate. They are small, but they're so important. It could be very, very important area.
[00:07:15] OK. So in the aged repair that we did, you saw the innovative masking and back masking that we did to achieve this envelope of clear. What we've got here, we've got -- and it's very important on repairs to try and retain in the body of the repair the same profile as the surrounding area. We're going to do some more innovative masking. We're going to sand near the body of the clear, the fresh clear. Then we're going to demask to the outer layer of the masking tape. And with this very fine, we can do this by hand. This is the feathered wet edge to the 320 tooth that we sanded yesterday. We can repair this by hand to protect this very fine edge. We're using today a three step. We may not need the three step. We'll start with one, two and three using, for the sanding at least, wet on the 3000 to 5000. You can use wet and dry materials you can use this time to try. So we start with sanding, masking, first of all.
[00:08:25] You see the distinction between gloss on this fade out. We need to first band on the fade out here and then what we're going to do next is going to over apply over the sanded edge, because now we've got the full body of the clear. Kind of a soft face can be left, as is. It's all to do with preference and what we're trying to achieve.
[00:09:08] So we'll take out the three thousand by hand. And we can just detail it by hand.
GFX: Use water along with P3000 Sandpaper
Then we're going to finish up with a 5000. The finer the grit, the high gloss recovery or the easier the gloss recovery. Little bit of water on that and just around the perimeter. The next stage is by machine You start off on a low speed and just build into it. You see the glass with recovering immediately.
[00:10:16] So as you can see, we've got the profile of the original paintwork, we're coming into the repair itself following the light source. The profile is the same. It's not sanded flat. The edges are nice and glossy, near invisible MRO environments.
[00:10:44] So we would call that a successful repair. The fresh CMO 85180 can be successfully spot repaired using the blend technique. What we're doing to recover the gloss is we first sanding with P1500. Water as a lubricant. We sand the spot repair itself into the body of the original clear. That's followed by P3000 again using the water as lubricant that sanded over the 1500 to get rid of those 1500 scratches into the original body of the clear. Followed by using a machine polishing process using the 3M three stage process. We're using 100% lamb's wool, relatively low speed. You don't need to really burn through this. And what we're using is stage 1, 2 and 3 to recover the gloss. We continued up following on final using the foam pad to get the final polish marks out from the film and to make sure it matches the surrounding area.
[00:12:08] Follow us on our YouTube channel, Sherwin-Williams Aerospace for all future smart repairs.
GFX: Sherwin-Williams Aerospace Coatings
Swaerospace.com